About the tool that makes everyone’s lives easier
Over the course of the last few couple of weeks, I’ve been so into my LOD tool project, constantly learning and wanting to improve, that I felt like I needed to try doing something else with the unreal python API to further expand my knowledge and understanding of it.
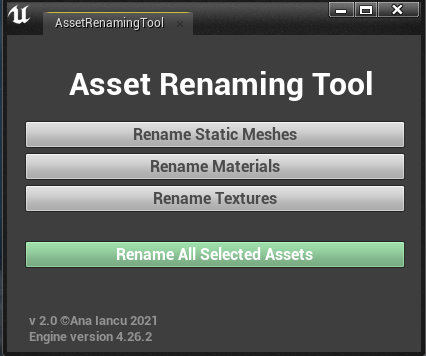
So I chose to make a little tool that takes all the assets you’ve selected in the content browser, identifies whether they’re a material, texture or static mesh and adds the prefix M_, T_ or SM_ to its name accordingly.
After making sure that everything works properly in my own projects, I decided it would be time to share it with my classmates and see what they think about it. The first two versions of this tool didn’t have a UI, so it wasn’t too intuitive to use, as you would have to run it from the context menu. Later on however, I decided to give it a simple interface and have people try it out again. The response has been much better ever since.
Now, I realise a tool like this is nothing in the grand scheme of things and that most studios have probably had something like this for ages, but as a student and someone new to python, I think it was good practice.
You can download the .uasset file here. Feel free to use it in your project.
Thanks for reading!
Coming Up With the Idea
Creating a good shader implies a lot of research - from the type of material to its surface properties, the process definitely isn’t simple. But once you’ve got a general idea of what it is you want to make, it goes a lot more smoothly.
The Shader Creation Process
The most essential part of my shader creation process is iteration. Whenever I get to a point where I like the way a shader behaves, I’ll make a copy and continue experimenting from there, and so on and so forth. And just like that I end up with 15 material copies and 10000 material instances, but cleaning that up is a job for later.
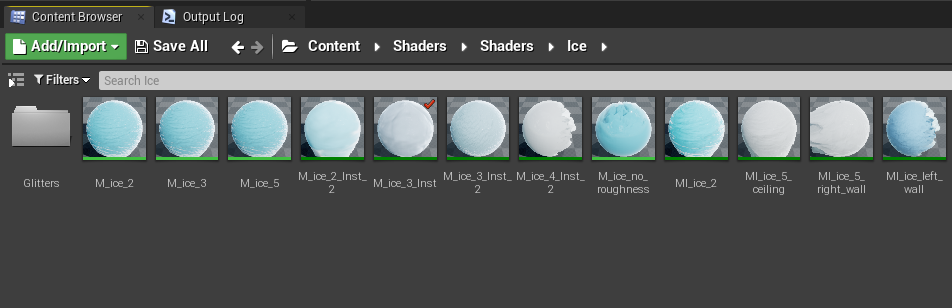
Ice
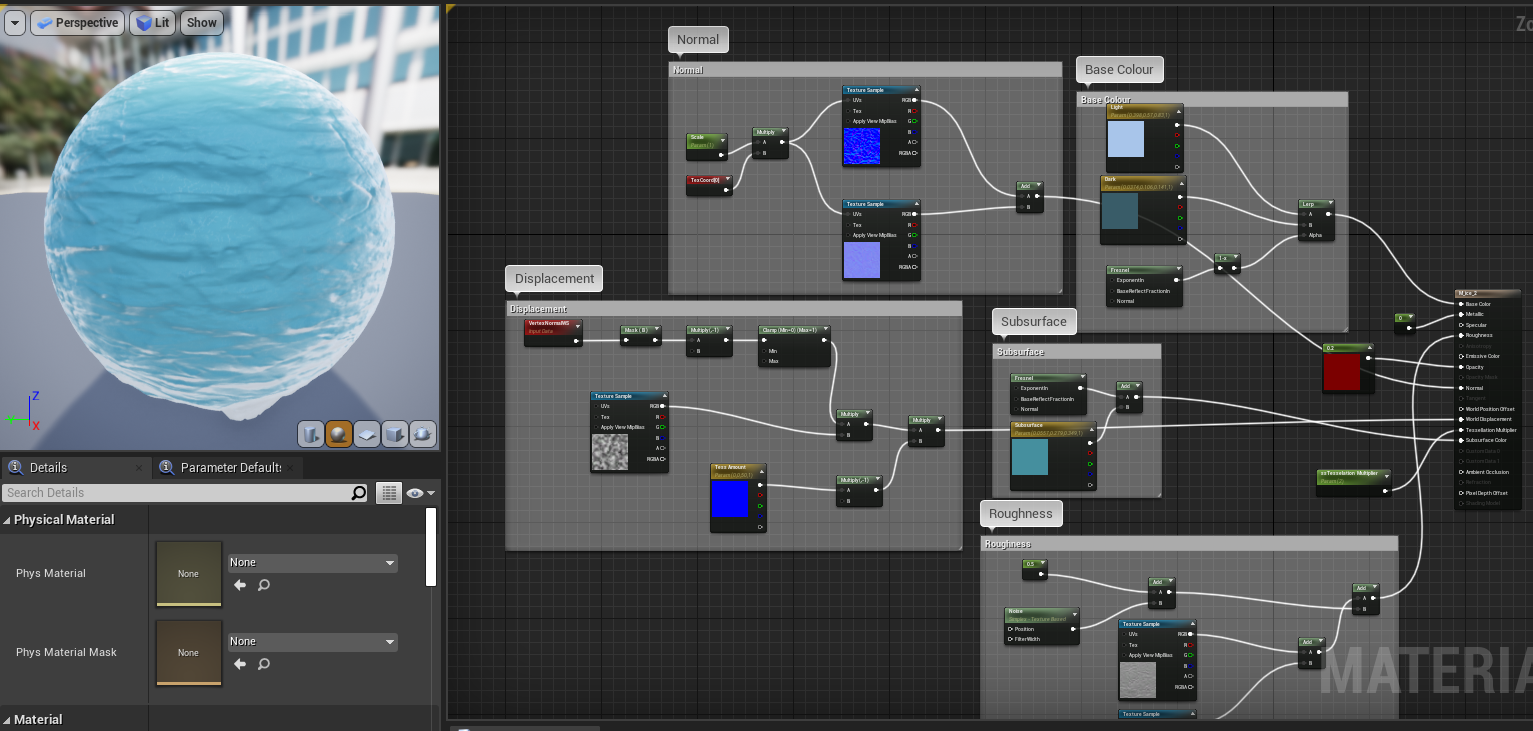 I started with a Ice material based on a stylised ice reference I found online. The shader uses tesselation and world displacement to create an icicle effect, so I ended up attempting to make sime from it too.
That didn’t quite work out, as I couldn’t find the right noise to use for the displacement, and no matter what I did it looked really spikey. I will eventually go back to it and figure it out, but for now I realised it doesn’t go with the general theme of my museum which is Winter.
I started with a Ice material based on a stylised ice reference I found online. The shader uses tesselation and world displacement to create an icicle effect, so I ended up attempting to make sime from it too.
That didn’t quite work out, as I couldn’t find the right noise to use for the displacement, and no matter what I did it looked really spikey. I will eventually go back to it and figure it out, but for now I realised it doesn’t go with the general theme of my museum which is Winter.
Snow
Then, still from the ice, I made snow, by changing the subsurface colour from blue to a light gray, and adding parameters to change the U and V tilings of the normal maps, as well as a flatten normal node.
From there I experimented a lot with an emissive shimmering glitter system I set up like so:

The inspiration came from this blog post, courtesy of Nina Klos. I decided to attempt to make my own version of the glitter effect she did for her sand shader, except my one was supposed to replicate the way snow glows in the light.
Northern Lights
At this point it was very clear that the theme of my museum is Winter or Christmas or North Pole or just something to do with the cold season. Like I mentioned in a previous post, this all happened involuntarily, but I definitely don’t mind.
I then figured that I should just think about everything that makes me think of this theme. Since I’m going to Norway this winter, I thought I could make that the focus of my project. Well then, what does Norway have that other countries don’t have? Northern lights. And reindeers, but I don’t think that would make a good shader. Oh and good food.. anyway.
I set up the base Northern Lights shader in a very simple but effective manner, by using an opacity map and a gradient to control the colours.
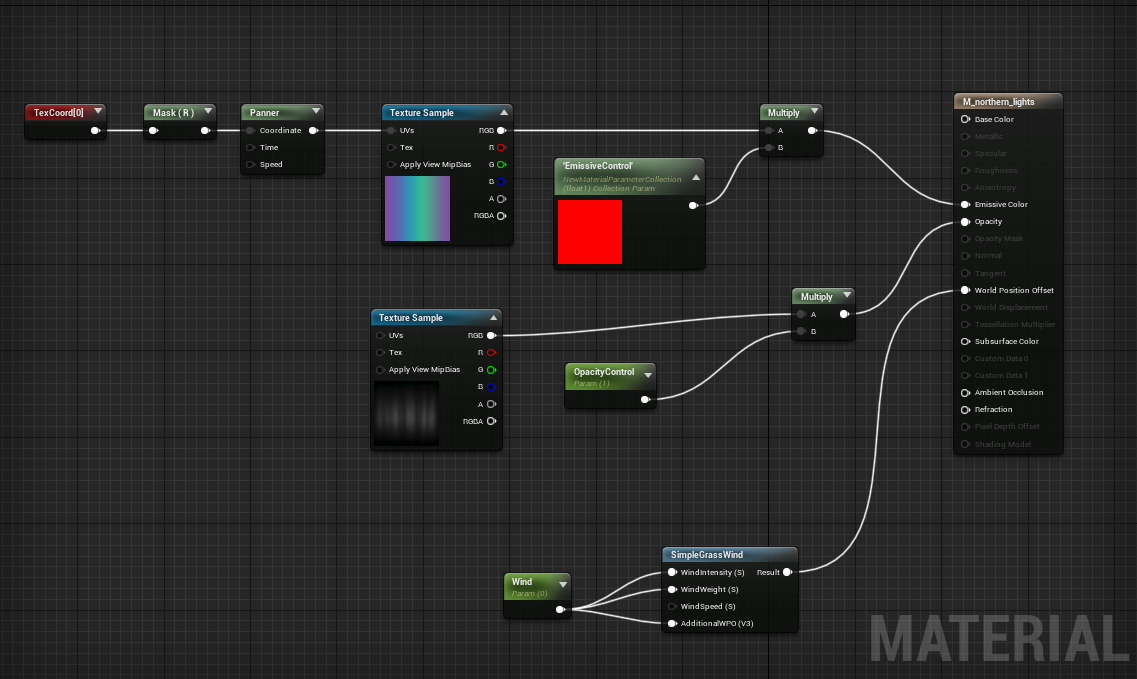 From there, I wanted to experiment with dynamically changing the emissiveness in a blueprint, but I had no idea how one would go about doing that. An hour of Kat and I frantically trying to figure it out later, I finally found the solution. Making a parameter collection. By doing that, then creating a scalar parameter named
 Emissive_control, I was able to modulate it’s value based on a timeline in blueprints. The result looks like this:
The Museum Layout
One of the most crucial parts of this project is presentation. Technical ability is definitely right up there with it, but if my scene looks bad, I’m never going to be able to showcase my shaders properly. I started looking into Ice Hotels for reference, and I thought that looked cool, but maybe an igloo would be better, as I could play around with the way the outside world affects the walls.
I’m yet to figure out exactly what I want it to look like, but I think having a little hole at the top of the igloo that you could see the sky from (and therefore the northern lights) would be a really good way to present my work.
More Updates Soon! Thanks for reading.
Making an UI in Unreal Engine 4 is really easy
Making a good looking UI however.. not so much. The first limitation of the Editor Utility Widget Blueprint is that you need to break your code into little snippets in order to assign it to buttons. That gave me a little headache to begin with, but at the end of the day I had both the code and the UI ready.
Now, I’m not saying this is the best looking UI on planet Earth, not even close. It’s just there to ensure the tool works as intended for now. Eventually I will give it a prettier face too, but as for right now, have a look.
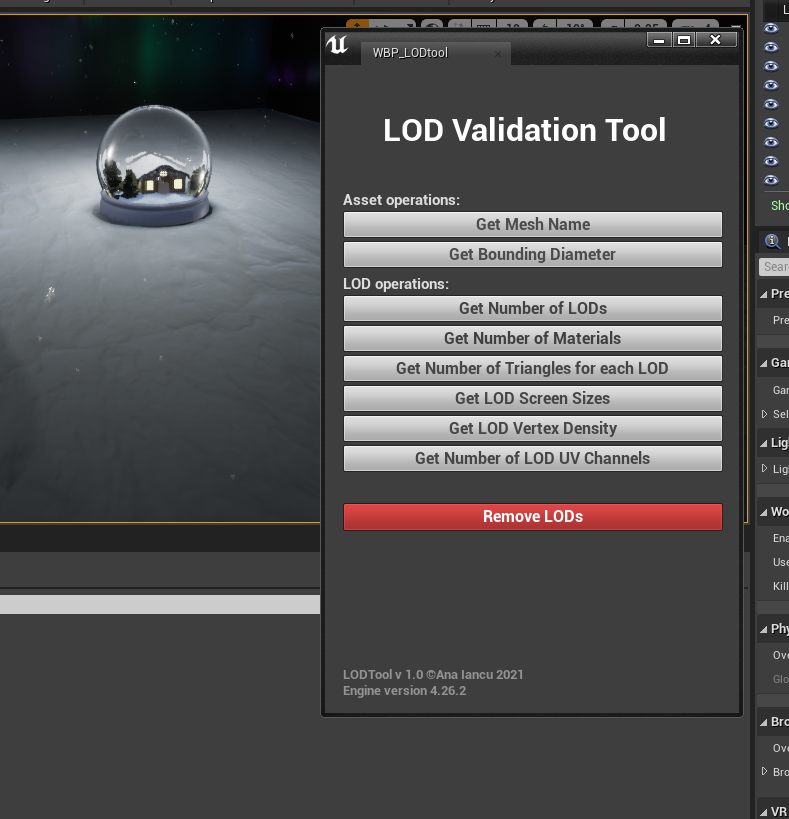
I still need to figure our how exactly to get the window to be the right size when you open it, but that’s a job for tomorrow me. Tonight me will take a little break and relax with a cup of peach and orange tea (if you haven’t tried it yet, this is your sign - you will not regret it).
That’s all for this little update. See you in the next post!
Working when you’re sick is difficult
Not to speak the obvious with the title, but dealing with staying on top of things when you’re not feeling 100% can be really difficult, both mentally and physically. For me, it was mostly the struggle of needing to know I’m on track to finish my projects before the deadline. Because I’m still quite new to python, having no rough estimate of when the tool could be finished by did stress me out a bit.
A surprising outcome
I’ve now lost a grand total of 5 working days either setting up my workspace at university (we’ve recently changed rooms and I had to move my old computer to the new room) or being sick. That’s a long time in the production world.
We’re now at the beginning of week 3 of university and I can proudly say that 95% of the tool functionality is implemented. All there really is to do now is to make a pretty UI for it, which I’m hoping to get done by the end of this week, or early next week. I’ve recently had to follow a very strict no work in the weekends policy, enforced by my thoughtful partner whom already thinks I’m working too much. Maybe that really is the case.
The Mysterious get_num_sections() Function
I had been looking for a way to get the triangle count for each LOD for ages. I tried getting the number of polygons first, then based on that calculating the number of triangles. That didn’t work. Tried the same with vertices. Same situation.
But then, the magical get_num_sections() function appeared out of nowhere to save the day. Well not really - I desperately googled until I found it. Regardless, this then allowed me to use the get_section_from_static_mesh() function, which returns an array of information about the static mesh such as triangles, vertices, etc.
Here’s the code that saved me a breakdown:
1
2
3
4
5
6
7
8
9
10
11
12
13
14
15
16
17
18
19
20
21
22
23
def get_lod_triangles(static_mesh):
    lod_details = []

    lod_no = unreal.EditorStaticMeshLibrary.get_lod_count(static_mesh)
    unreal.EditorStaticMeshLibrary.set_allow_cpu_access(static_mesh, True)

    for lod in range(lod_no):
        triangle_count = 0
        num_sections = static_mesh.get_num_sections(lod)
        for section_number in range(num_sections):
            section_data = unreal.ProceduralMeshLibrary.get_section_from_static_mesh(
                static_mesh, lod, section_number
            )
            triangle_count += len(section_data[1])
        lod_detail_dict = {"lod_number": lod, "triangle_count": triangle_count / 3}
        lod_details.append(lod_detail_dict)

    for lod_detail_dict in lod_details:
        print(
            f"LOD number {lod_detail_dict.get('lod_number')} has {lod_detail_dict.get('triangle_count')} triangles.\n"
        )

    return lod_details
A new way to manage projects
Working on two projects at once can seem easy at first, but once you start getting more and more into each one of them, it can get overwhelming. So I was faced with the challenge of sorting my messy head out - but how?
At first I thought I was limited to google docs or my bullet journal, but then I discovered notion. I made a very simple system - divide tasks by projects and give them relevant types to describe the tool I need to use to complete the task. And so was born the ultimate head decluttering system.
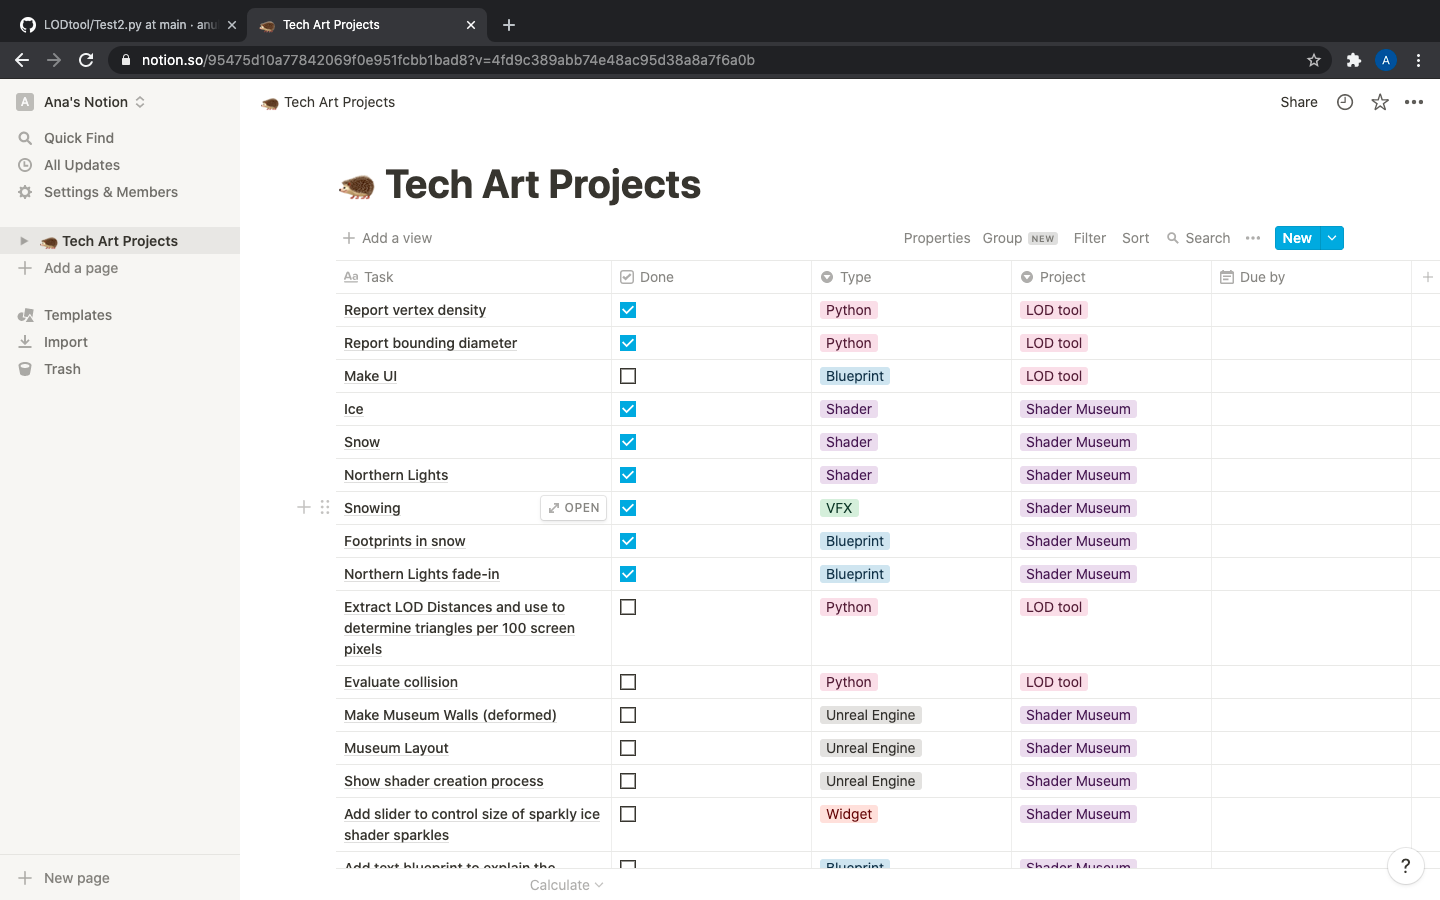
This works really well for me because you can sort tasks by project, type and whether or not it has been completed. That way I can also keep track of what I’ve done so far, so I don’t end up thinking I haven’t been productive.
Dealing with the lack of resources
Unreal Engine 4 itself is admirably well documented. Its python API however.. not so much. It took me a good minute to understand how to read said docs, and how to work with certain classes, but in the end I decyphered it (to some extent).
Being on a Game Art course and choosing to do Technical Art, while it definitely was the right decision, can also be challenging at times. There isn’t really a way for me to bounce ideas off people or get any feedback, but there’s also upsides to it. I can wander around a room full of ridiculously talented people, admire their art and clear my head talking to them about anything but my work, and that usually leads to a fresh perspective when I return to my desk.
So What’s Next?
My goal now is to start making my code work with Editor Utility Widgets, in order to make a UI. I figured it would be easier to make it directly in UE4 rather than through code, as the visual aspect of it will be a massive help. I know presentation is just as important as the functionality with this project - the user needs to be able to use the tool intuitively, regardless of their knowledge of the code behind it.
Thanks for reading!
The logic behind the system
Before starting working on the actual blueprints, I made a clear list of things that I’m gonna need to make it work:
- a footprint opacity map for each foot
- a footprint normal for each foot
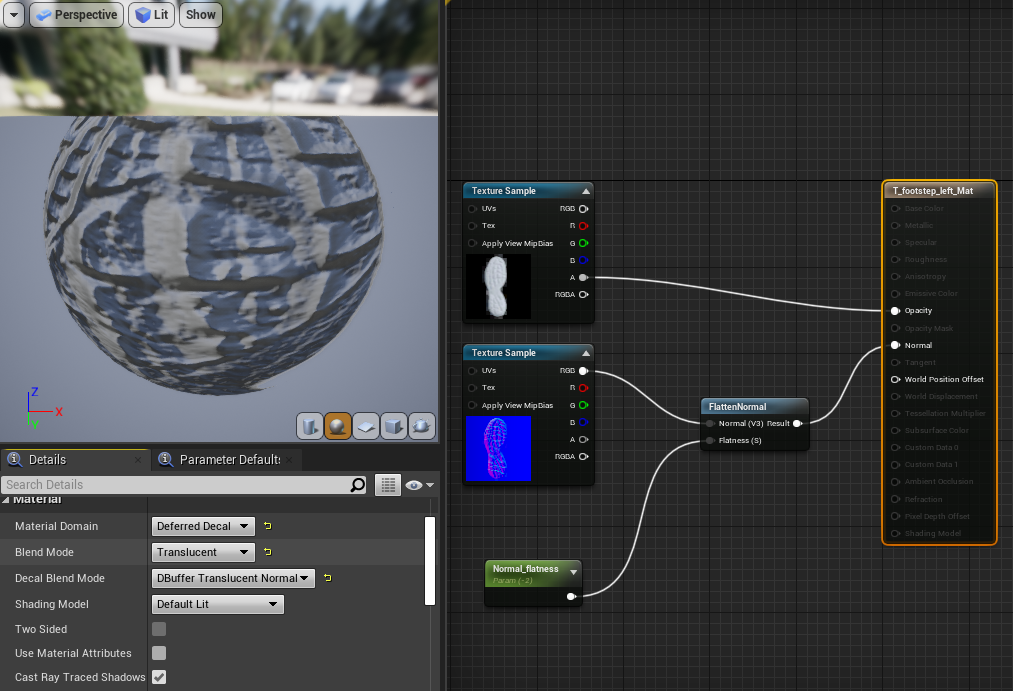
- deferred decal materials for each foot using the
dbuffer translucent normalblending mode - blueprints for each feet that uses a decal component with the materials created before
The process
Textures and Materials
I went through a trial and error process trying to find the best footprint textures for the task. Here’s some of the ones I tried.

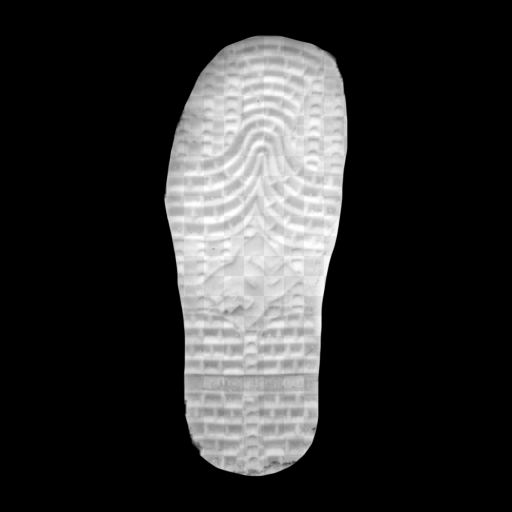
In the end I went with this one.

Then I proceeded to set up the materials like so:
Blueprints
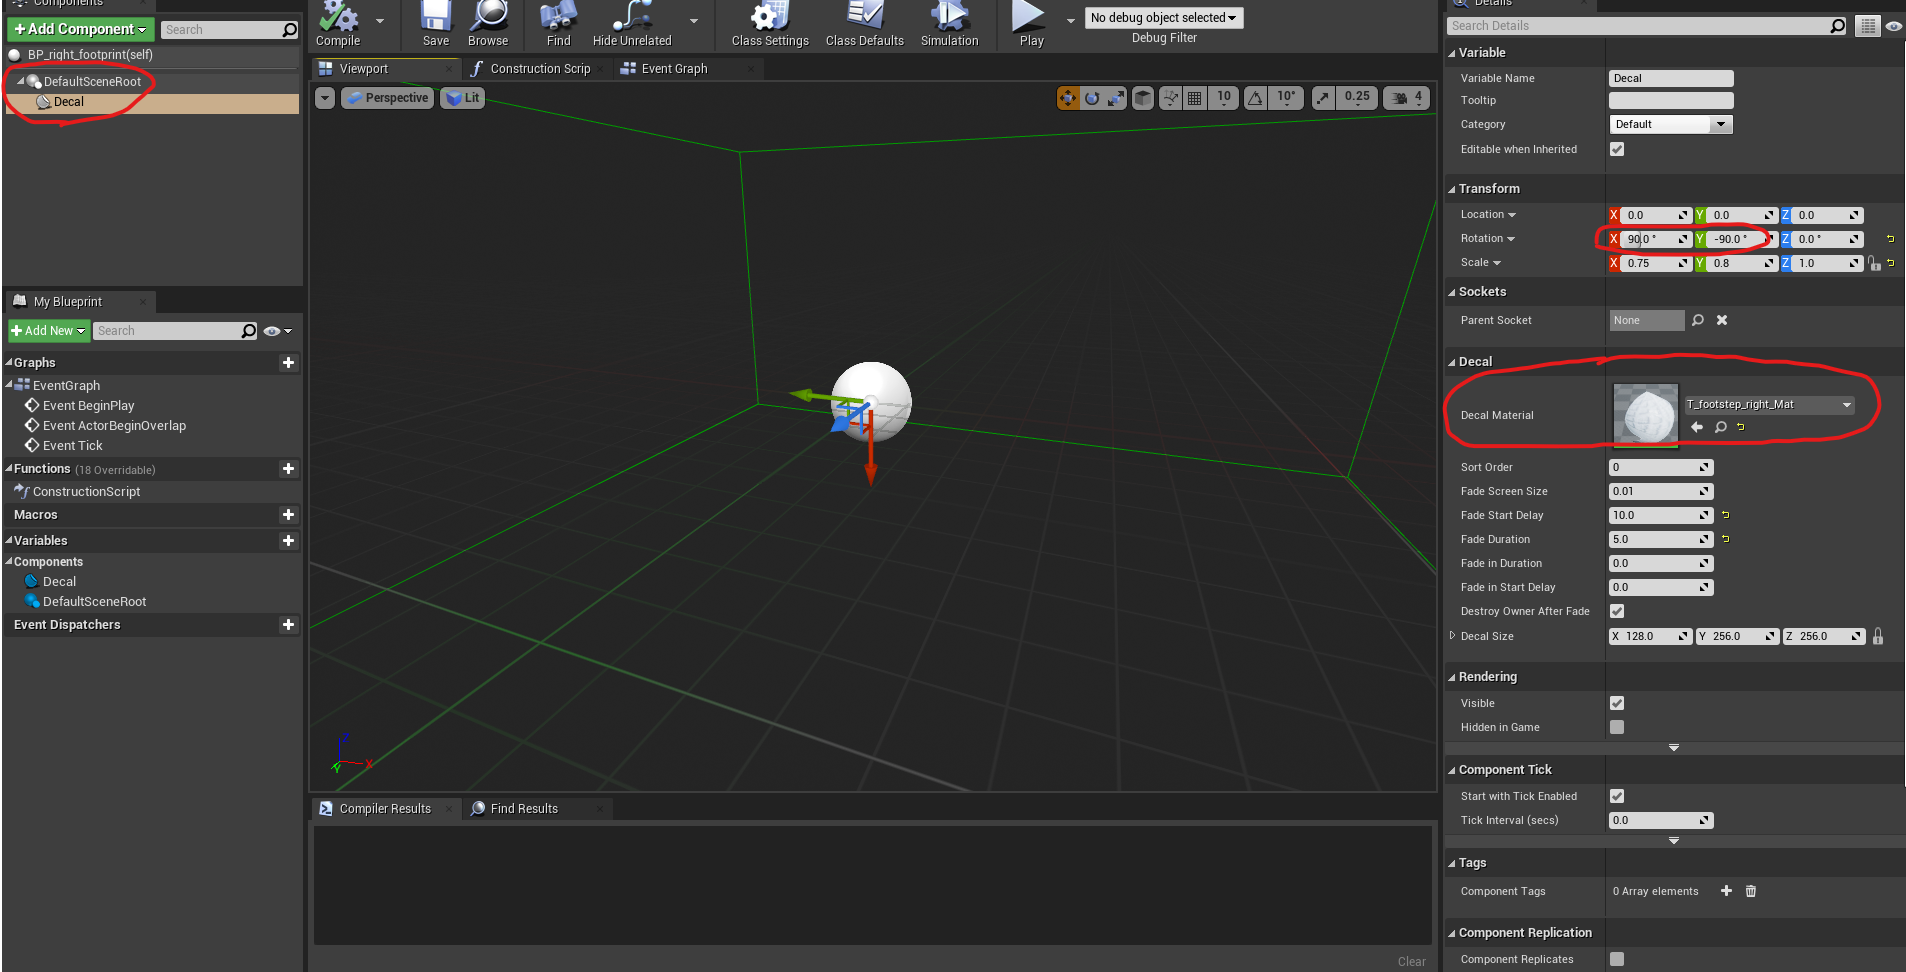
The first blueprint I made is using a decal component that has the footstep material in the allocated spot. I made one for each foot.
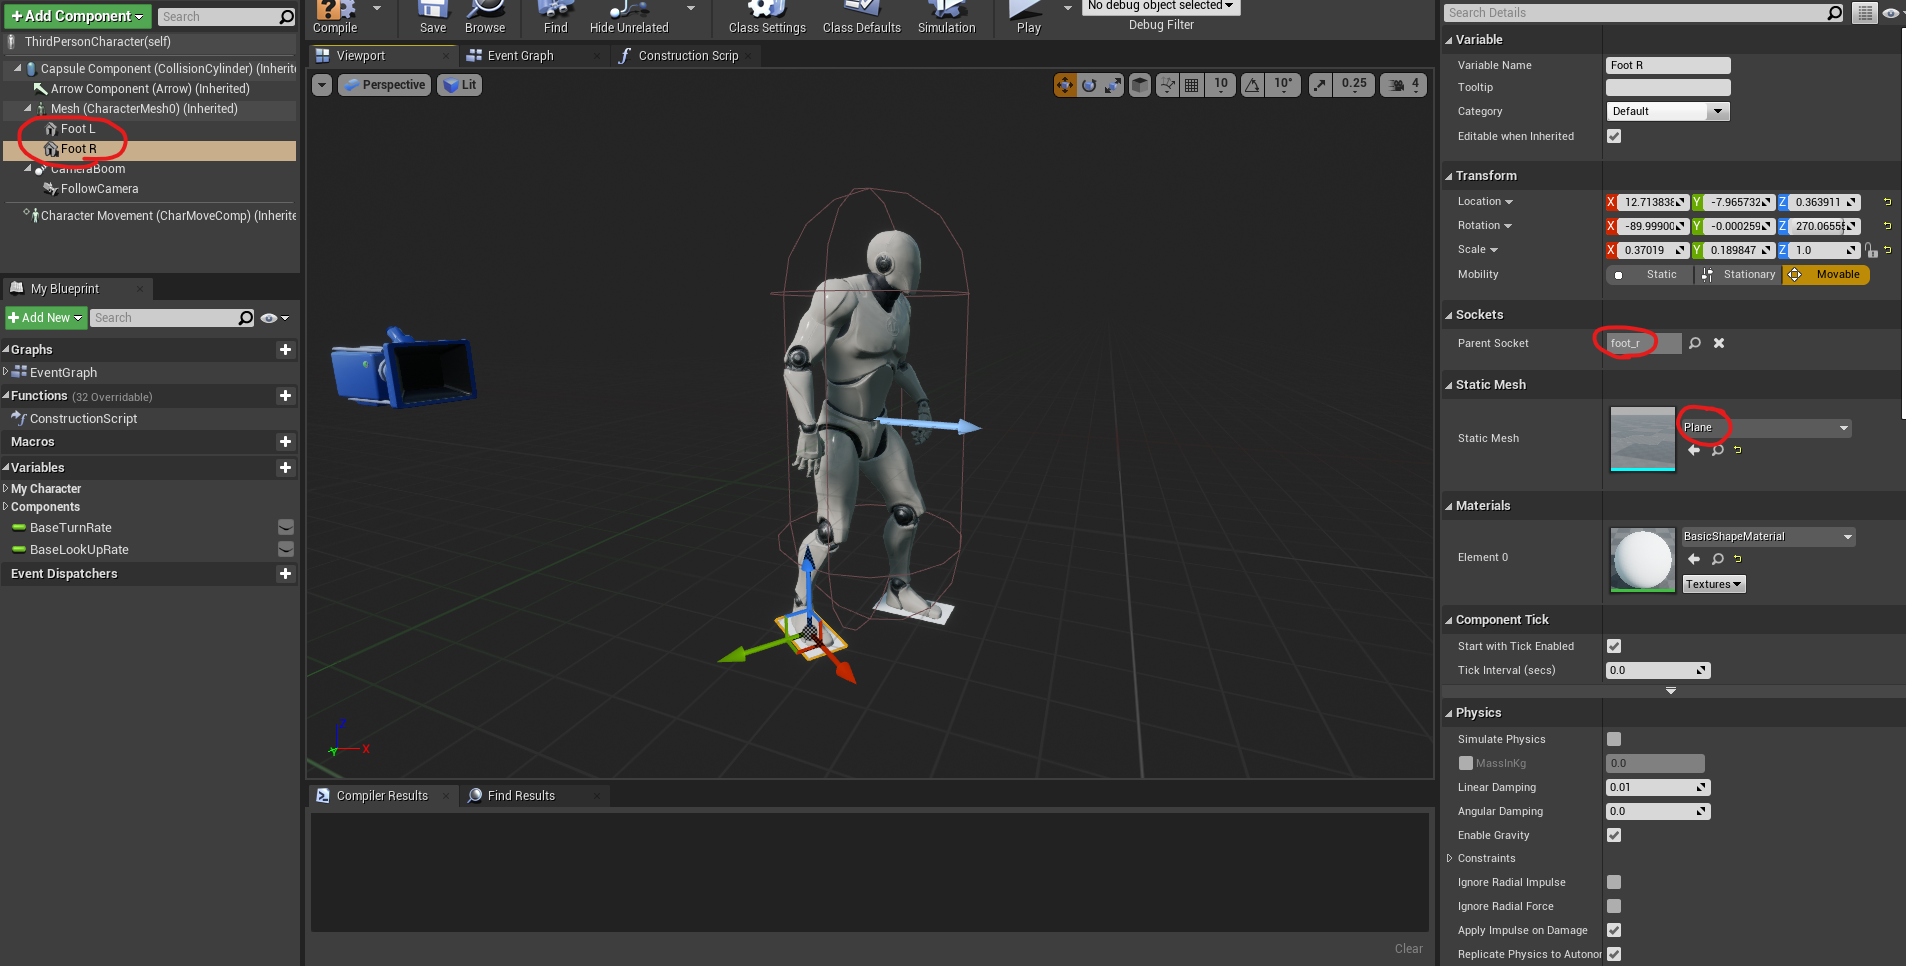
Next up, inside the ThridPersonCharacter blueprint, I added two plane components (these are going to display our decal). I parented them to the character mesh (CharacterMesh0) by dragging them under it, and added parent sockets to each of them, foot_l for the left foot plane, foot_r for the right foot plane.
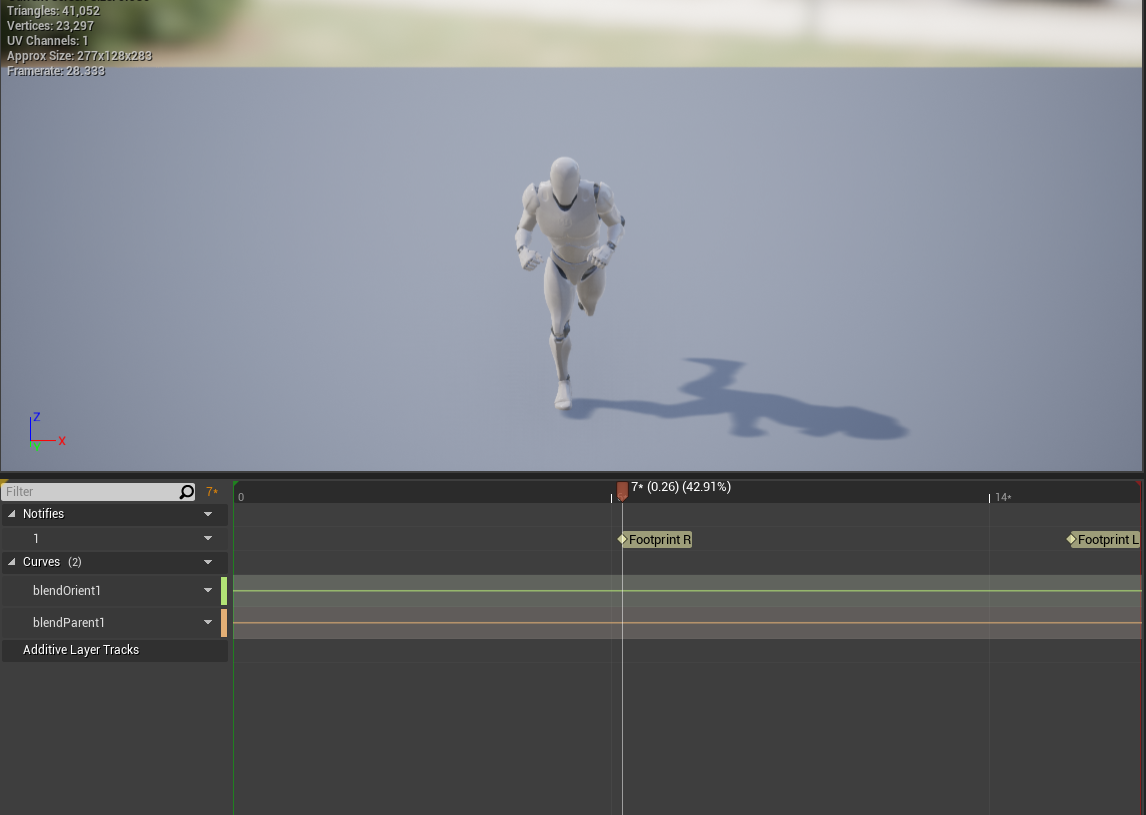
After that, I headed over to Mannequin>Animations>ThirdPersonRun to set a couple notifies when the foot touches the ground in the animation. I’m going to use these later on in the ThirdPersonAnimation blueprint.
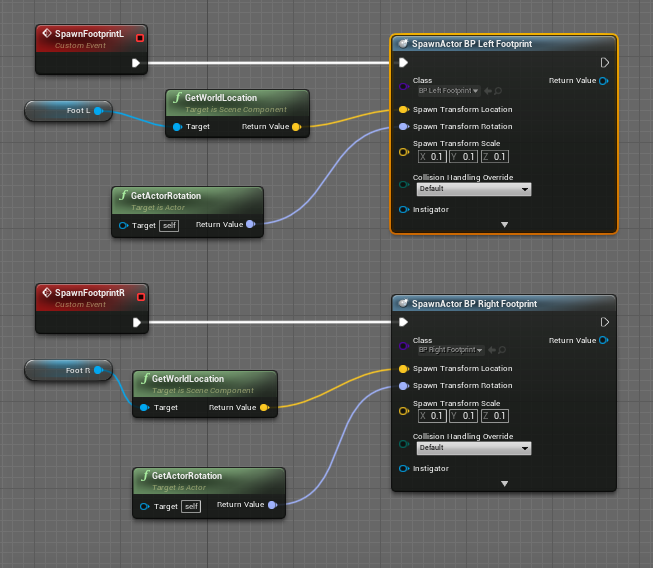
I can now go back to my ThirdPersonCharacter blueprint event graph to set up a couple custom events. I start by making a SpawnFootprintL event that spawns an actor from my BP_Left_Footprint (the decal component blueprint that contains the material). I then drag and drop a reference to my Foot L plane that I set up at the base of my character’s foot, in order to be able to track its location.
Initially, I thought the rotation of the footprint should be that of the plane, but thanks to this tutorial I found out that it should actually just be the actor rotation.
I then went ahead and copy-pasted the code from the left foot and changed the reference and the class for the right foot (BP_Right_Footprint).
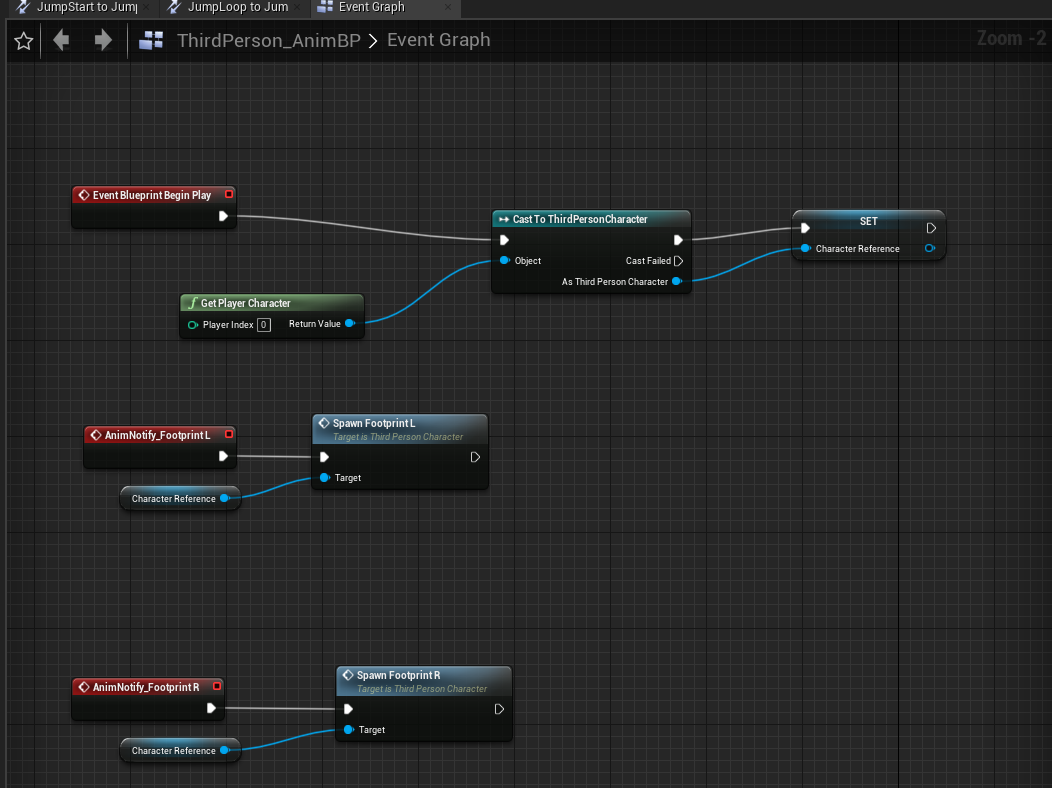
Now that that’s set up, I headed over to the ThirdPersonAnimation blueprint event graph. The logic here is that I want the footprints to spawn only when the feet touch the ground. I do that by getting an Event Blueprint Begin Play that’s casted to the ThirdPesonCharacter and an AnimNotify event for each foot. What this will do is esentially, every time the animation notify I previously set up in the run animation is called, it will trigger the custom events I just set up inside the ThirdPersonCharacter blueprint and spawn a footstep.
Phew, that was a lot. Surprisingly, when I hit play, everything worked accordingly. All I needed to do now was to adjust the sizes of the decal blueprints to match the size of the player’s foot. That took a bit of playing around, but in the end I got it to match pretty well.

Hope you enjoyed my little (not so little) tutorial. It was a long process, but thankfully google is a thing nowadays.
Resources I haven’t previously mentioned:
Normal map only footprints - this is where I got the idea to use a DBuffer Decal blending mode instead of translucent.
Unreal Engine 4 - Deforming Snow Tutorial - this was just general inspiration, I didn’t end up doing this