Shader Museum - Progress Progress Progress
Let’s start with the obvious
My museum needed a face lift. A big one. That was my mission for this week, to try to push the environment a bit further while maintaining focus on the main thing, of course, the shaders.
My plan was to dress up the place a little bit, make it look less empty and cold. Luckily, we had a little feedback session last week where we were able to show our work to our peers and the tutors and everyone was able to speak their minds. I got some really good suggestions from people and I’ll show the ones I put into practice below.
Add Christmas Lights!
Of course. How could I miss that? First thing on the to-do list was to add some nice lights to bring the place together a bit more.
I made a blueprint that uses a timeline to affect the value of 2 separate scalar parameters that control the emissiveness of the lights.
Initially, the way the lights behaved was a bit of a mistake, but before I got a chance to fix it, it really grew on me and everyone seemed to agree, so I left it alone.

Give the Ice Some Depth!
Easier said than done. I’ve been experimenting with ice shaders for weeks now, and nothing really seemed to make me go “that’s it!”. Until now; I’ve finally figured out a way to give the ice depth by first taking a look at a video that explained the theory behind the feeling of “depth” by using vectors to exemplify.
Esentially, the video covered the relationship between the camera vector and the reflection vector (reflection is a mirror image of the camera vector, but it is above the surface) and the relationship with the transmission vector and the reflection vector (the transmission vector is an inverse of the reflection, therefore it is below the surface and gives the illusion of depth). That helped me understand the maths behind it a lot better.
The in depth explanation of the shader setup (nerd alert, read at your own risk) is not all that complicated. I first took the camera vector and transformed it to tangent space, then plugged that into a CustomReflectionVector node along with an engine default normal map in the normal input (it was a bit of a trial and error process to pick the right normal map). I’m then taking the Z (also known as B) value of the custom vector and absoluting it so that any negative value is turned to positive, then dividing that by the same noise I’m applying this whole maths to but multiplied (this gives me the actual depth effect). Then I’m masking the custom vector on the X and Y (R and G) axes and multiplying that by the maths I described above, and then multiplying the entire thing by a little bit more maths that allows me to control the effect based on the resolution of the texture. My texture was 2048x2048 so I used the value 2048 here. (I never used that number so many times in a row in my whole life). I then added that with a TexCoord node and plugged it into the UVs of my noise, then finally blended that with a pale blue colour and plugged that into my base colour.
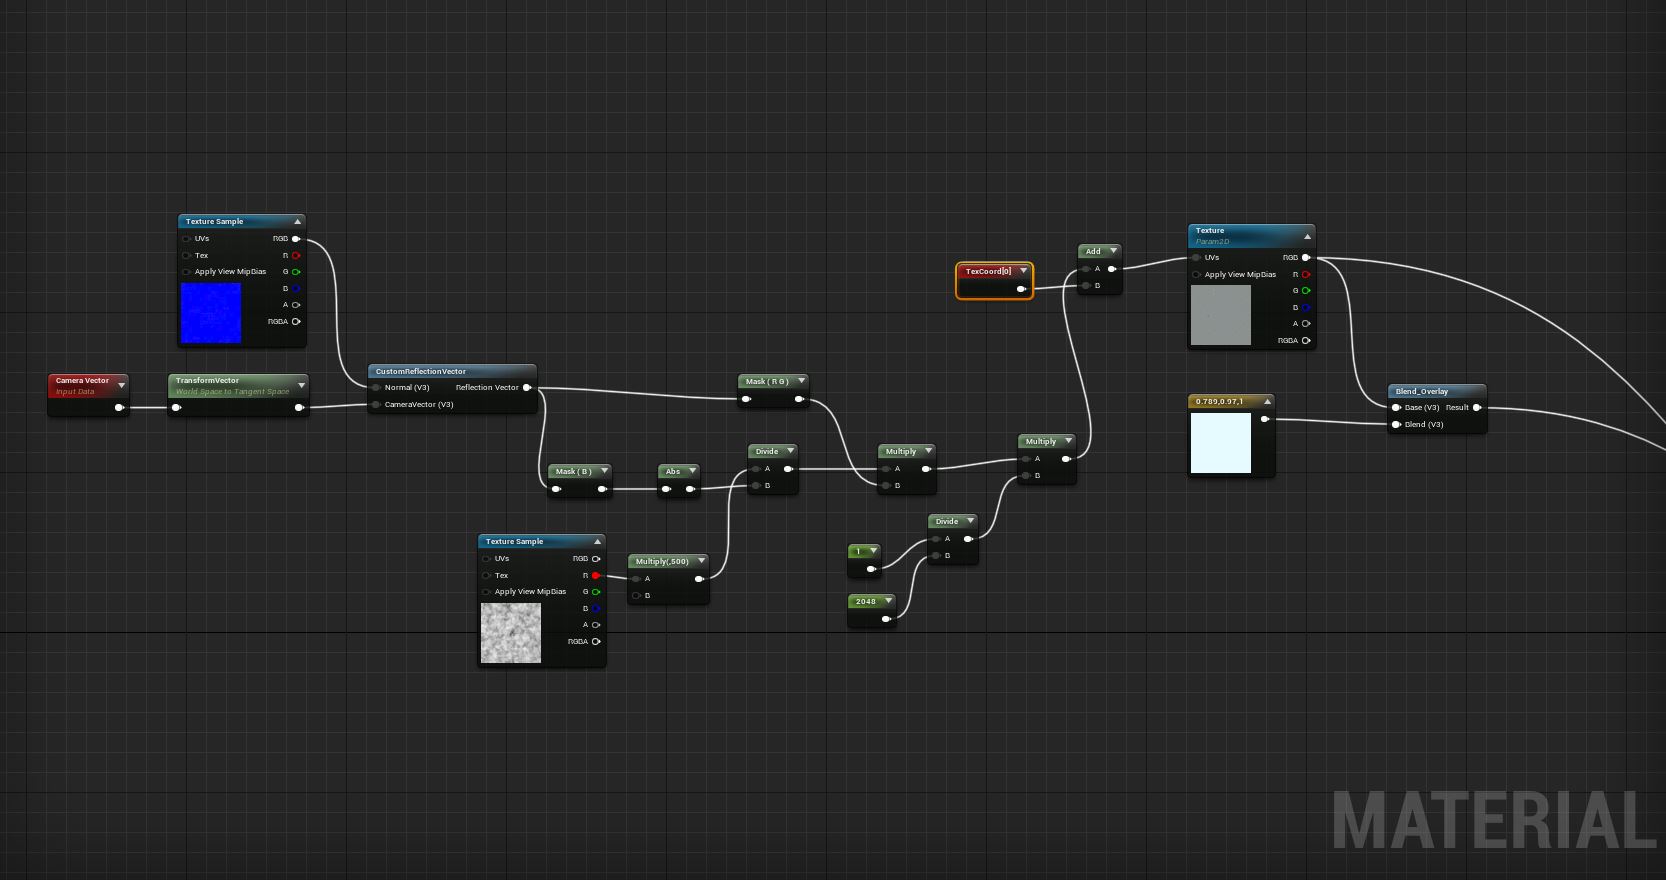
Phew, that was a lot. Moving on, the rest of the shader is stolen from my old ice shader, so the normal, specular and world displacement are the same, I won’t bore you with that again. Finally, take a look at the new and improved effect.
Make an Ice Sculpture
Full credits to my amazing classmate Illias, who took one look at my ice shader and said “why don’t you combine that with glass?”. Good question Illias, I have no clue why I haven’t done this yet. Such a simple yet elegant way of achieving see through glass. I combined the depth effect I described above with a glass shader I previously made and turned it into this gorgeous little reindeer. Yes, the shader is a reindeer.
All jokes aside, check it out.
.png)
The Disappearing Snowglobe
One morning I went to university and said you know what, this snowglobe takes up too much space in the middle of the room. What if I could make it come down from the roof on a platform, that way it would bring attention to the Northern Lights as well when you look up.
I made a blueprint that contained 2 snowglobes, one at ground level and one on the roof. I turned off visibility and collision for the one on the ground then used it to reference its location in the blueprint. I later on learned that I could use a simple trigger box instead of a whole invisible globe, but we live and we learn. I then used a timeline to set the new location of the snowglobe on the roof to the location on the one on the ground. Relatively simple.
The way this works now is it reacts to a trigger box that the player walks into, but I want to set up a button that you can press to trigger this event.
Other Little Changes
I’ve changed the presentation stands to a simpler design made purely to show off the shaders, which has improved the overall look of the museum a lot, as it looks way less cluttered. I’ve added a couple of rectangular lights at the bases of each stand as well, varying the colour based on the look of shader that’s on it.
I’ve also added a hole in the ground that you can “fish” through, but really it’s just to show off my new water shader.
.png)